Tuesday, June 28, 2011

Rarity Embroidery Design & Process

I have gotten quite a few questions about how I make the designs I post. In order to answer that question, I wrote up this explanation so that others can follow along. The embroidery process that I use is roughly the same as professional services follow. This process is called 'digitizing'. I use 2 software tools to digitize an embroidery design:  MS Paint and Embird 2003. I should also point out that Embird costs about $500, so keep that in mind.

I use MS Paint to draw the design if I am making a design from scratch, or I use it to make any required edits to an existing sketch or drawing.  For this exercise, I am going to use an existing drawing and turn it into an embroidery design, so I am not going to use MS Paint in this walk-though.

The digitizing process is something like vectoring an image.  Shapes are drawn, and each shape has a bunch of properties such as the amount of fill, colors, direction, and such. Embird is the software that provides a canvas for this process.

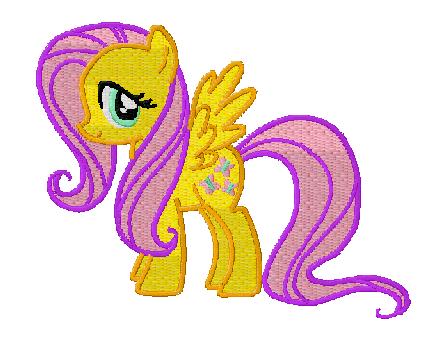
For this tutorial, I am going to use an existing design from the interweb, as that will give a good overview of the process without taking too long to write up.  The design that I am going to do is this one, by Shelltoontv since I can't draw for a damn.


The first step is to open up the digitizing stupio in Embird.  My screen is preconfigured with some settings for my designs, such as the size of the hoop/design (100mm by 100mm hoop size/embroidery field size), but Embird can go to whatever size is needed.


Once Embird is opened and the embroidery field is set to the correct size, the picture can be imported.  Imported is actually a misnomer, as all Embird does is set the picture as the background so that thread can be put on top of the design.


Once imported, you can start drawing shapes that will be filled with thread.  Some decisions need to be made depending on the design.  For example, what color goes first.  It doesn't have to be decided immediately as the order can be changed later if required, but it will help if the decision is made now, and made correctly.  In this instance, I am going to do the mane first.  The reason is that the jumps between sections can be hidden under other colors.  This helps with trimming and thread changes when actually sewing.

Rarity's mane is 3 colors (light and dark purple, plus the outline).  I am going to start with the lightest color, and use a fill object.  A fill object is pretty simple, it is a big blob of thread in any shape with the thread all running in the same direction in the same color.  First, I outline the area (see below with the red outline on the right) I want to fill with the thread color.  The squares and circles are used to move the outline once placed.  By default, the fill start point is the first click, and the end point is the last click.  Any of the squares can be a start or end point, which helps with thread routing between different sections that are the same color.


When doing the fill, I want to go over the edges to allow for pull in the direction of the thread.  Pull occurs because the thread is under tension, and will scrunch the entire design in the direction that the thread is being pulled.  The amount of pull depends on the fabric, machine, hoop, and stabilizer used.  To make up for that pull, the fill area will go underneath the entire outline area, plus some additional area to make up for the thick nap on a towel.  This will let the same design be used on multiple fabrics and look great, but the order of the thread colors can't be changed due to the overlap.  This is why it is important to get the color order correct on the first try. Once the first fill is done, the 2nd fill of the same color can be made, and so on, until that color is done.


Once all the areas are done, you need to tell the software where to put the jumps between each area.  By default, the needle will jump without sewing any stitches int he space between the areas.  Sometimes, this is the best option, but usually (between fill areas anyway) you want the machine to actually sew stitches.  This will help hide the thread under the next color, and prevent the foot of the sewing machine from getting stuck on the jump.  To do that a connection object is used.  Think of a connection object as nothing more than a line that is sewn.  Using the same movement options as the fill, the connection object can be routed where it will not be seen in the design.  Here's a connection that was drawn between the 2 parts of the same color of Rarity's mane, in the rendered view so it can be easily seen.  The jump is under the rest of the mane.  I did not go under the portion of the design that will be white, as the purple connection could show between the gaps in the white thread.  The different colors of purple in the mane will hide the jump very well.


Now, you can go on to each color that needs to be done.  Between colors, I check the render of the design to make sure that I haven't made any stupid mistakes.  It's easier to fix them now, then later.  The first render below is the 2 different colors of mane fill, and the 2nd is for the body.  Note the hole in the middle of the white fill which is where the eye will be.


The last fill is the blue eyeliner and cutie mark.  The cutie mark is done no differently than other fill, though I sew it twice in opposing directions (left/right, then up/down) to get some extra definition.  For the eyeliner, I changed the direction of the fill after laying out the fill (upper right in the below pic of the fill properties) and the density (upper left of the pic, showing 4.0).  The direction is the direction that the needle travels when sewing.  For all the fill areas, I use a simple left to right or right to left fill.  For the eye liner, I used a vertical fill.  The density is how many stitches there are in a given area.  I made the density half normal.  this will make the blue of the eye liner look a little softer.


Once the fill is done, I move on to another difficult portion; eyes.  Eyes are very complicated, and need to be done really well in order to convey emotion.  The wrong size pupil can make it look like a character is stoned at best, or derp at worst.  Generally, I do the whites of the eyes as fill, then the black pupil, and finally the colored iris as a column object.  Using a column object (I'll go over this in a moment) will get the thread pointing the same way the filaments in an iris point, so it will look more natural. As a last step, I do the eyelashes as they generally need to overlap parts of the eye.  Here is a closeup of the finished eye, showing the different columns and jumps.


Once the eyes are, I move on to the outlines.  The order that the outline is done is very important.  The outline will make or break the entire design.  A good outline will more than make up for a poor fill, and a poor outline will make a design look very bad no matter how good the rest of the design looks.

Outlines are done a little differently than fill, because the stitches will look bad if they all go in the same direction.  For an outline, I want the stitches to always go across the outline, just like the eye iris.  To do that, I use a column object. A column object will always have the thread going across the short dimension of the object. For outside outlines, or outlines between colors, I generally go with a width of 11.  This is a good balance of being able to see, but also not large enough so the outline is overwhelming.  For internal lines (like the inside of the ear or the highlights in the mane) I go with a width of 5,6 or 7 depending on boldness.  Anything smaller than 5 will not stay together on most fabric.

When doing the outline, it is important to keep in mind that thread can't be started and stopped after doing part of an outline.  If a dead end or such is required, then the thread will need to either be put under another part of the design, or the thread will need to be trimmed off after (or during) sewing of the design.

Also remember that when doing the outline, it is important to keep layers in mind; both in thread count and in thread order.  Columns put a lot of thread in a small area, making it difficult to sew over.  4 layers is about the limit before thread or needles will break, or stitches will be skipped when sewing. The thread order is very important too.  Generally, it is better to do a body outline after a fill, and doing the 'top' outlines after underlying outlines..  For example, the outline of a necklace should be done after the outline of the neck.  This helps the necklace look like it is on top of the body outline, which is more natural.  I did Rarity's mane first, then the body outline.  This helps the mane look like it is coming out of the body, instead of sitting on top of the body.


In some instances, especially with MLP:FiM characters, I will flip the order of the pupil and eye white that was discussed earlier.  This is because of the white reflection mark that is on the pupil in MLP.  Doing black first will save 1 thread change (black - white instead of white - black - white).  Not all designs will allow this and still look correct though.  A careful consideration must be used to determine if the thread change is worth the trade off in design 'correctness'.  In this case, I chose to have an extra white at the end for the 2nd pupil reflection.


The last step is to do a final check of the digitized design, then compile it for your sewing machine.  Below is a look at the objects without having the stitches rendered.   This helps in finding areas that ware too overlapped, or not overlapped enough.


During the actual test sew, I find improvements that can be made in a small portion of the designs I make.  Usually they are very small, like adding an extra stitch or 2 in order to fill a blank spot.  For example, in this design, I may change the color of the body to off-white and use white for the pupil.  The body may not be clearly differentiated in this design, and a test is pretty much the only way to tell for sure. (Update: after test sewing, I DID make this change.) Once that sew is complete, the design is done and you have a beer.

As I mentioned earlier, this process is the same as a digitizing service would follow with 2 possible exceptions.  The first is the software.  I use Embird, but there are lots of options out there.  For example, Pulse is the program that SparkleStiches uses for her designs. The 2nd change is the final step in Embird will differ depending on the expected machine the design will be embroidered on.  I chose the PES format, because that is what my machine understands, but nearly any format can be compiled.

There are some tools out there that will take an actual vector file and attempt to turn it into an embroidery design automatically.  The general consensus on sewing forums is that there is no existing software that even comes close to a manual design.  I have tried quite a few of them, and come to the same conclusion.  The automatically created designs look like junk compared to a manual design.  Even my very first design looks an order of magnitude better than any program's best attempt at an auto design.  The direction of the thread, size, order, and such are just too difficult for an automated program to figure out.  Sometime in the future, I'm sure that software will be better, but for now, auto-digitizing is a waste of time and resources.

Here's a picture of the test sew on a wash cloth.


The completed design can be downloaded here.

Colors:
Purple - 2081 (internal mane) After testing, I think this may be too dark
deep purple - 2083 (external mane)  After testing, I think this may be too dark
off White - 2115 (body)
White - 2149 (eye)
Dark Purple - 2305 (mane outline and highlights)
blue - 2233 (cutie mark & eyeliner)
blue - 2230 (iris)
black - 2150 (eye)
Warm Gray - 2138 (body outline)  I need a lighter gray, this is the lightest I have
White - 2149 (eye)

Monday, June 27, 2011

Egophiliac's Comic of Luna & Celestia

This is an embroidery design of Egophiliac's comic that can be found here.  Sorry for not posing more often, but this took a boatload of time to make and sew.

All designs are made for a 100mm by 100mm hoop, though the bottom middle panel (alfalfa monster) is best sewn on a 4 by 6 3/4" hoop as it is split in the center.  If you have a Brother machine with a 4 by 4" field, there is a 4" by 6 3/4" hoop with multiple mount points that can be used to simplify the hooping process. If you have the 4 by 6 3/4" hoop, then there are a total of 9 hoops required.  start at the bottom right (part 01) to make lining up the panels the easiest. Work in a zigzag pattern (bottom row right to left, then left to right, then right to left for the last panel). Each separate hoop has a colors.txt file that will tell you what order to use the thread colors.  I didn't list them here for brevity's sake.

The total stitch count is 123,183 with slightly over 1800 yards of thread between 23 different thread colors.  Total design time was 44 hours, 22 minutes with sewing time adding an additional 9 hours and 6 minutes.  It cost just over $55 in materials to make, but oh so worth it.


 You can download all of the embroidery files here.

Sunday, June 26, 2011

Fluttershy Pocket Topper

Fluttershy, how did you get in my pocket?  A new meaning of Pocket Pony.  Here's a render of the design:

Colors;
yellow - 2005 (body)
pink - 2179 (mane)
magenta - 2269 (mane outline)
gold - 2021 (body outline)
black - 2150 (eye)
white - 2149 (eye)
black - 2150 (eyelashes)
light green - 2241 (eye)


You can download the file here.

Friday, June 24, 2011

Luna Pocket Topper

I made a Luna pocket topper by request.  Sorry for the horrible pictures, my camera hates taking pictures of black shirts.

Colors:
Sky blue - 2198 (Hair)
Blue - 2092 (body)
Red - 2042 (mouth)
Midnight Blue - 2070 (Luna body outline)
Aqua - 2233 (hair outline)
Dark Blue - 2072 (crown)
Black - (Eyes)


The file can be downloaded here.

Thursday, June 23, 2011

Filly Luna Embroidery Designs

"When I grow up, I'm gonna be an astronaut and visit the moon big sister!"

Today is 2 for 1 day since I was unable to get a new design done yesterday.  There are 2 Filly Luna designs, one with cutie mark, one without.  The colors are the same, in the same order, for both designs.


The colors on the renders are off, but here is a render of the 2 designs.


Both files can be downloaded here


Colors:
Sky blue - 2198 (Hair)
Blue - 2092 (body)
Dark Blue - 2072 (crown & cutie mark)
Electirc blue - 2230 (crown outline and shoes)
Aqua - 2233 (hair outline)
Sky blue - 2198 (Shoe Outline)
Midnight Blue - 2070 (Luna body outline)
White - (Eye & cutie mark)
Black - (Eye)
Electirc blue - 2230 - (Eye Iris)
black - 2150 (eyes).

Tuesday, June 21, 2011

TOOT TOOT TOOT TOOT

TOOT TOOT TOOT TOOT TOOT TOOT TOOT TOOT TOOT TOOT TOOT TOOT TOOT TOOT TOOT TOOT TOOT TOOT TOOT TOOT TOOT TOOT TOOT TOOT TOOT TOOT TOOT TOOT TOOT TOOT TOOT TOOT

Translation:  Pinkie Pie the Prankster design.  I did a test run of the design on denim and figured out just how hard it is to embroider on denim.  The fabric changes dimensions as it is sewn, so the later colors don't line up very well.  The pull compensation needs to be set dynamically to sew decently.


Sorry for the crappy picture.  I can't turn the flash off, so the shinyness of the thread is kind of overwhelming. You can download the file (with regular pull compensation) here.

Monday, June 20, 2011

Celestia the Alfalfa Monster

I saw a comic of Celestia and Luna that was just too cute for words a while ago and I really wanted to do a design of Celestia the Alfalfa Monster.  Sadly, the resolution was just too low, and my machine was just too small to make a design.   The artist made a bigger image of that panel, and I had a new hoop overnighted, so now I can do that design.  The hoop is 4 by 6 3/4", but my machine can stil only do 4" by 4".  The larger hoop makes it so you can do 2 designs with a minimal seam.


I had a bear of a time with the text, and tried a bunch of different settings.  Sadly, nothing looks good, while still fitting in the hoop with the design itself.  That's why the text is crazy hard to read.


There are 3 embroidery files.  One is the complete design for a hoop that is 4" by 6 3/4" or larger.  The other 2 designs are the split of Celestia and Luna for the Brother 4" by 6 3/4" hoop.  You can download the files here.

Colors Part 1 (Celestia)
White - 2149 (body)
Pastel blue- 2143 (celesta's mane)
Pastel green - 2234 (celesta's mane)
Pastel purple - 2079 (celesta's mane)
Pastel Pink - 2179 (celesta's mane)
Yellow - 2005 (crown and highlights)
Green - 2015 (alfalfa)
Dark Green - 2108 (alfalfa outline)
Purple - 2083 (eyes)
light gray - 2138 (celestia's outline)
gold - 2162 (Crown Outline)
Black - 2150 (text and eyes)
Cream Brown - 2019 (table bottom)
Tan - 2130 (table top)

Colors Part 2 (Luna)
Red - 2042 (mouth)
Sky blue - 2198 (Luna Hair)
Blue - 2092 (Luna body)
Midnight Blue - 2070 (Luna body outline)
aqua - 2233 (hair outline)
Black - 2150 (text and eyes)
Cream Brown - 2019 (table bottom)
Tan - 2130 (table top)

Sunday, June 19, 2011

Mrs. Cake Embroidery Design

Here's another background pony, Mrs Cake.   The different shades of pink took some fenagling to get right.


You can download the embroidery file here.

Colors:
Dark Pink - 2167 (dark part of mane)
Yellow - 2005 (apron)
light blue - 2089 (body)
Brown - 2161 (cupcake cutie mark)
Bubblegum Pink - 2165 (eyes, earring, apron, cutie mark)
Light Purple - 2204 (apron outline)
Light Pink - 2179 (light part of mane)
Black - 2150 (Eyes)
White - 2149 (Eyes)
Red - 2042 (Mane outline)
Electric Blue - 2233 (Body Outline)
Black - 2150 (eyes)

Friday, June 17, 2011

Lotus and Aloe as Fillies

I don't think there can ever be enough love for random characters. Here's an embroidery design of Aloe and Lotus, the 2 Spa Ponies as fillies.  I have also seen them named the Tranquil Blossom Twins.  Either way, they are the pair of spa ponies from the Green Isn't Your Color episode as fillies.  The designs are basically the same, just with different colors, so I only did a test sew of Aloe.


You can download both designs here.

Colors for Aloe:
pink - 2179 (body)
light blue - 2089 (mane)
White - 2149 (highlights)
black - 2150 (eyes)
magenta - 2041 (body outline)
electric blue - 2233 (mane outline)
White - 2149 (highlights)
black - 2150 (eyes)
light gray - (outlines)

Colors for Lotus:
light blue - 2089 (body)
pink - 2179 (Mane)
White - 2149 (highlights)
black - 2150 (eyes)
electric blue - 2233 (body outline)
magenta - 2041 (mane outline)
White - 2149 (highlights)
black - 2150 (eyes)
light gray - (outlines)

Thursday, June 16, 2011

Lotus & Aloe the Spa Ponies Embroidery

Here's an embroidery design of Aloe and Lotus, the 2 Spa Ponies.  I have also seen them named the Tranquil Blossom Twins.  Either way, they are the pair of spa ponies from the Green Isn't Your Color episode.


You can download the design here.

Colors:
pink - 2179 (mane and body)
light blue - 2089 (mane and body)
White - 2149 (highlights)
electric blue - 2233 (body outline)
magenta - 2041 (body outline)
black - 2150 (eyes)
light gray - (outlines)

Wednesday, June 15, 2011

Embroidered MLP Version of Invader Zim

Alcohol was involved.  That's all I am going to say.


The design can be downloaded here.

Colors:
Light Green - 2241 (body)
magenta - 2269 (shirt)
Light Gray - 2138 (weapon)
pink - 2179 (eyes, arms, highlights)
Purple - 2083 (tail, weapon)
dark brown - 2129 (weapon)
White - 2149 (teeth)
Dark Gray - 2167 (boots)
black - 2150 (outline)

Monday, June 13, 2011

Twilight Sparkle Standing Embroidery

Here's a design of Twilight Sparkle standing around, looking like a boss.  I didn't use a topper on the test which is why Twilight looks fuzzy.


Colors:
Light Lylac - 2081 (body)
Dark Blue - 2070 (mane & tail)
White - 2149 (eyes and cutie mark)
pink - 2167 (mane, tail, cutie mark)
Dark Purple - 2083 (mane, eyes)
Dark blue - 2072 (mane & tail outline)
Dark Purple - 2083 (body outline)
Black - 2150 (eyes)
White - 2149 (eyes)


You can download the embroidery file here.

Sunday, June 12, 2011

Embroidery Design of Derpy Hooves Sitting

There can never be enough Derpy Hooves.  As such, here is an embroidery design of Derpy Hooves sitting down looking cute.


You can download the embroidery file here.

Colors:
Yellow - 2005 (mane)
Light Gray - 2138 (body)
Dark Gray - 2296 (body outline)
Black - 2150 (eyes)
White - 2149 (eyes)
Gold - 2021 (mane outline)
Light Purple - 2204 (cutie mark)

Saturday, June 11, 2011

Luna Raising the Moon as a Filly

I saw this comic and wanted to do a pattern based on it.  I started with the sequence of 5 'panels' of Filly Luna raising the moon.  Here's a render of the panels and the test of the first 4 panels.  The full size is 4.5" tall by 10 inches wide, so I needed to do 5 different designs.


All 5 designs can be downloaded here.

Friday, June 10, 2011

Fluttershy Standing Embroidery Design

I was asked to do a design of Fluttershy in this pose, so here she is.  The most annoying part was getting the butterflies in  Fluttershy's cutie mark come out decently.


You can download Fluttershy's design here.

Colors:
yellow - 2005 (body)
pink - 2179 (mane)
magenta - 2269 (mane outline)
gold - 2021 (body outline)
white - 2149 (eye)
light green (eye)
black - 2150 (eye)
white - 2149 (eye)
black - 2150 (eyelashes)

Thursday, June 9, 2011

Fluttershy's Cutie Mark in Embroidery

Next on the list of the main 6 is Fluttershy's cutie mark.  The only annoying part on this design was getting the antenna's of the butterfly's just right.

 Here is a version on some scrap fleece, the rendered version, and a pic of the design on a fluffy towel.


You can download the embroidery file here.

Colors:
Pink - 2179 (wings of butterfly)
Light Blue - 2233 (body of butterfly)

Wednesday, June 8, 2011

Embroidery Design of Trixie

A brony asked me to do Trixie, so here she is in her cape and wizard hat.  It took a while to figure out how to make Trixie's cape and hat look good in thread, but I like how it came out.


The file can be downloaded here.

Colors:
purple - 2081 (cape)
light blue - 2198 (body)
blue - 2069 (cape accents)
sky blue - 2143 (hair)
gold - 2162 (stars on cape)
purple - 2081 (iris)
black - 2150 (eye)
white - 2149 (eye)
pastel blue - 2089 (hair outline)
royal purple - 2083 (cape outline)
electric blue - 2230 (body outline)
pastel green - 2241 (emerald)
green - 2015 (emerald outline)

Tuesday, June 7, 2011

Cherilee's Cutie Mark in Embroidery

With Cherilee, I decided to do 2 designs.  One as a full 100mm by 100mm design with one of the 3 portions of the design, and one with all 3 within 100mm by 100mm.  That will grant some flexibility on sizing.


You can download both designs here.