I have gotten a ton of requests to embroider eyes and cutie marks for folks who want a MLP plushie. Sadly, a lot of the detail on embroidering eyes and cutie marks is lost when I try to make a patch out of them. The only option while keeping quality is to embroider directly on the fabric. If you didn’t have an embroidery machine, that meant sending me the fabric, I would embroider it, and then mail it back. That back and forth took about a month, and shipping cost was very high. I have been working on different solutions with a few goals in mind. The goals I had in mind were:
Realistic - The solution had to look like a MLP pony and be 'On Model'. They definitely had to be better than the new TRU plushes that frighten small children.
High quality - The solution had to be high quality. Quality is in the details, so the details have to be wonderfully made.
Huggable - The solution had to be cuddly and soft.
Durable - The solution had to be able to take abuse and rough play. Kids (and sometimes adults) are rough with their toys.
Inexpensive - The solution had to be easy to afford so that everyone can make MLP plushies. My specific goal was under $50 total.
Fast - Turn around time of less than a week so that folks don't have to wait.
Easy - the solution had to be as easy as possible for the buyer. Preferably a ‘one stop shop’
Pretty much everything I came up with failed several of those requirements, especially the inexpensive one. Shipping fabric around several times is not the best use of money. Then, about 2 weeks ago I was in a fabric store that I had not been to before. I was just wondering around when I came across a few bolts of high quality polar fleece. I stared at one of them for a while before I figured out why it had caught my attention. It was Lyra’s body color. That color is insanely hard to find, and here was 20 square yards that I ran across on accident. That fleece had to come home with me, and the idea was born. A MLP Plushie Kit.

My goal was to be under $50 for a MLP plushie, so I sat down and figured out just what materials would be needed, how much they would cost, and how to get them to someone for the cheapest way possible. I pared the list down to only those things that are harder to find, and put them all into the kit. When I was done, I ended up with a cost well BELOW my goal; only 38 bucks. Even a pony like Rainbow Dash with a bazillion colors would end up under $50.
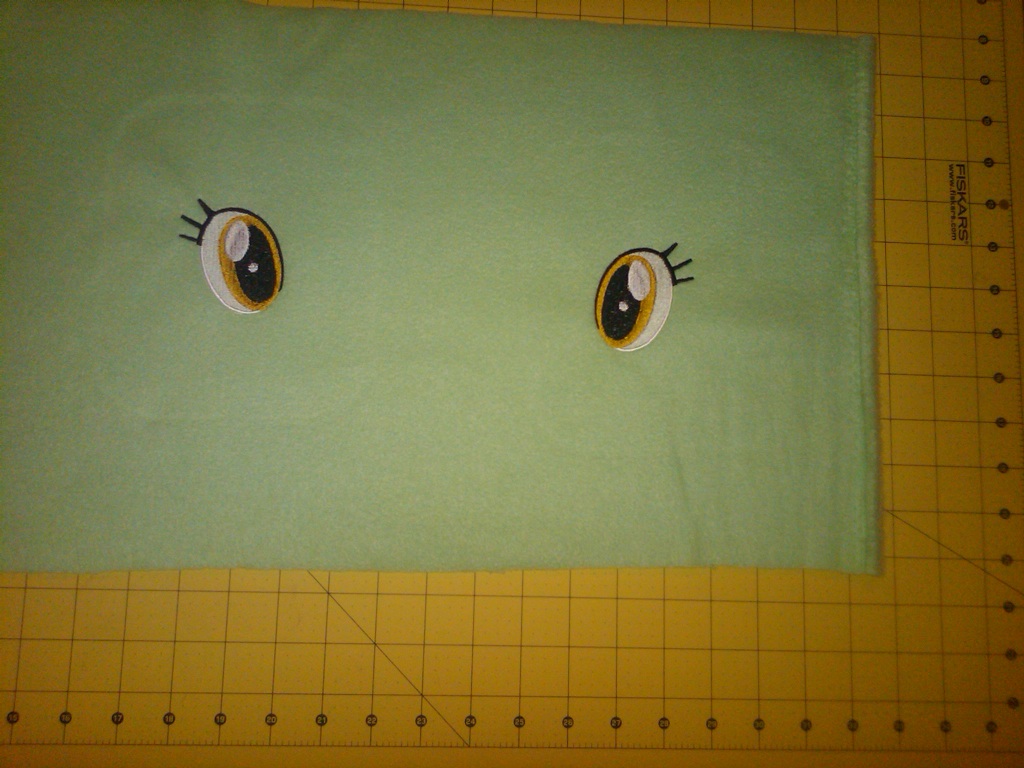
The Lyra Plushie Kit is designed to give you nearly everything you need to make a Lyra plushie. The kit comes with huggable soft polar fleece in the right colors that has been embroidered with Lyra’s eyes and cutie marks for a professional look. The embroidery sizing is based upon Valley Violet’s MLP pony pattern, which makes a pony at around ten inches tall. The eyes and cutie marks are each 65mm tall (about 2.5 inches). The embroidery itself is designed to be durable, and is overlocked at several points. This means that if something happens and some of the thread is cut (say, on a ceiling fan as you toss Lyra across the room) the embroidery won’t completely unravel. The black and tan grid that can be seen in the pictures are each one inch squares for reference by the way.


The main body of Lyra is made from mint polar fleece, and pieces of medium green and white polar fleece are supplied to make Lyra’s mane and tail. Polar fleece is soft, warm, and doesn't shed little bits all over like Minky or other microfiber fleece. This makes it a good fit for a plushie that will get hugged, and not necessary put in a display case on a shelf.
2 bobbins of thread that contain about 120 yards of thread each are also included so you can sew your plush together. 120 yards is enough for about 5 plushies, so you can test to your heart’s content. The thread is 40 weight polyester and is color matched to the mint fleece. As all seams are sewn inside the body and none is visible, the color isn’t all that important for most of the plush. The exception is the hand sewing required on the plush’s head. The thread comes on 2 bobbins, one is size L, one is size 15. This is equivalent to Brother SA155 and SA156 bobbins. About 99% of home machines use one of these 2 bobbin sizes. That means you can use one bobbin as a bobbin, and the other bobbin for the top thread. Most machines have a vertical feed that will take a bobbin for the top thread. In some cases, a spool pin or something like it may be supplied with the machine to support a vertical feed from a bobbin. Check your machine manual to see if it supports this type of feed. Do not use a bobbin for the top thread on a horizontal fed machine, and do not use it if your machine recommends against it. I have never had a problem with it on any sewing machine, but you know your machine best.

What you get:
Mint Polar Fleece - 58” wide by 12” tall, and embroidered
Medium Green Polar Fleece - 29” wide by 12” tall
White Polar Fleece - 29” wide by 12” tall
One class 15 bobbin with 120 yards of mint thread
One class L bobbin with 120 yards of mint thread
What you don’t get, but will need:
Sewing Machine (or lots of patience)
Marker
hand needle
Pins
Polyfill – Nearly every Wal-Mart caries this
Pony Pattern
http://valleyviolet.deviantart.com/
http://www.etsy.com/shop/valleyviolet
Or nearly any pattern where the end result is a pony roughly 10 inches tall.
The fabric is huggable soft polar fleece. The mint fleece (Lyra’s body) is 58 inches wide by 12 inches tall. For Lyra’s mane and tail, one piece of medium green and one piece of white is supplied, each at 12” tall by 29” wide. The sizes I have listed here are approximate, and may be plus or minus several inches. There is almost twice as much material as needed to make a Lyra plushie so you have lots of testing material.
Valley Violet’s MLP pony pattern is pretty popular, and there are lots of modifications to it that folks have done. One common modification is making the pony sides from 1 piece of fabric instead of two. The embroidered cutie mark locations support either one or two piece pony sides.
Hints:
The cutie marks and eyes are directional. This means there is a left and a right for both. When you cut them out, make sure you cut them out on the correct side. Measure twice cut once!

Make sure to sew the ‘wrong side’ together. When you make a plush, you sew it inside out then turn it right side out at the end. That means the embroidery will be on the INSIDE of the pony when you are actually sewing it.
I suggest not using the embroidered pieces for your first pony. Getting the eye placement just right can be time consuming. If the eyes are not lined up, your pony may look weird. Well, with the exception of Derpy. Pinning the pattern to the fleece then holding it up to a strong light can help you see how the embroidery lays out against the pattern. Once cut, it is all but impossible to fix, so take your time.
Tested with sewing machine needle sizes 11, 12 and 14.